Being a little OCD and owning a TVR is always going to cause some frustration, the aftermarket ACT sport tails are a great addition sound-wise, but you will pull your hair out with trying to get the Cerbera exhaust aligned.
With the hand-built nature of these cars being what they are, there are always going to be niggles – but this one has really frustrated me for years.
And to be clear, I am not alone with this, a good friend of mine who also has the ACT sports-tails has exactly the same problem.
I love the sound of the ACT rear tails, but they just don’t fit properly – it would be a relatively easy production issue to fix, but alas they are what they are.
If you’re reading this and own a Cerbera with the ACT rear tails, a lot of this is going to sound very familiar.
So what’s the problem?
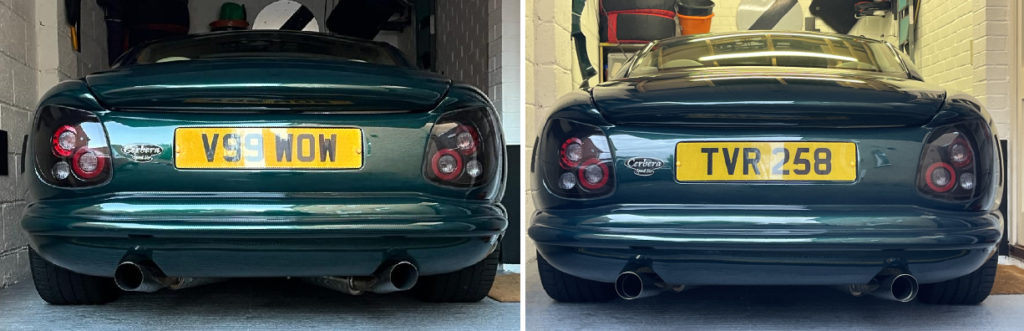
It’s a little hard to capture on camera, but the image on the left is the before (the ACT tails you buy off the shelf).
Aligning Cerbera Exhaust
There’s 3 problems with the geometry:
1. to align the exhausts to the recess in the bumper, the right hand one needs to be twisted up, meaning its centre section pivots down.
2. aligning the left in the same way, means the exhaust comes out at a different angle to the right
they are also then only mm’s from rattling against the gearbox or chassis
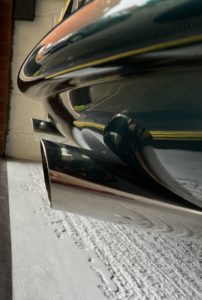
If you do manage to align them so they do sit flush with the bumper and just clear the chassis, you’ll notice the right had exhaust hangs lower, meaning an increased likelihood of grounding out on something. When I’m next under the car, I’ll grab a photo, but to achieve this alignment, the bracket and the pin that attach to the exhaust hanger are in such a weird twisted place that it is now prone to easily move.
3. but the most annoying thing is, now the scallop shape of the tips are not centred.
This is what it should look like
What is actually looked like before was the tips were out by at least 90deg.
To achieve the image on the right, took a whole day of cutting and welding at an exhaust specialist (thanks Kevin@Zero Exhausts) – but it’s well worth it, not only is it straight for the first time in it’s life, it’s now not prone to moving or the dreaded rattle.